CREATING AND DEPLOYING FEATURE IN MOSS
Windows SharePoint Services 3.0 introduces an inherently portable and modular functionality known as feature, which provides a mechanism for defining site elements.
A feature is a package of Windows SharePoint Services elements that can be activated for a specific scope and that helps users accomplish a particular goal or task.
Features are added to a target site or site collection through a process known as feature activation. The element types that can be defined by a feature include menu commands, link commands, page templates, page instances, list definitions, list instances, event handlers, and workflows.
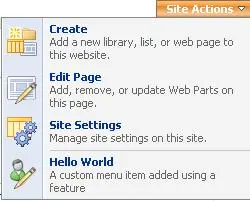
So let’s start writing a feature. The functionality of the feature which we are going to develop is that it adds a menu item “Hello World” in the “Site Actions” menu. Clicking on the menu item “Hello World” will transfer to Google. Our goal is shown in the figure below:
The first step is to understand the feature file structure. If you go to “C:\Program Files\Common Files\Microsoft Shared\web server extensions\12\TEMPLATE\FEATURES” directory, you will see features already existed. Each feature has a file “feature.xml” and other file usually named as “elements.xml”.
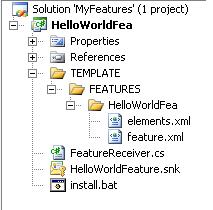
Now we move to VS 2005 and create a new class library DLL project and name it “HelloWorldFea. Now, it will be intelligent to create the same structure of files as that of WSS 3.0 in the VS 2005.
Create a directory “TEMPLATE” in the solution. Inside the “TEMPLATE” directory, create another directory “FEATURE” and lastly, in the “FEATURE” directory, create directory with the same name as that of the project which happens to be “HelloWorldFea”.
Now, create a xml file and name it “feature.xml” inside the directory “HelloWorldFea”. In this xml file, we will write the details that will define the high level attributes of the features itself. Add the following XML to the “feature.xml” file.
<Feature
Id=“”
Title=“HELLO WORLD FEATURE“
Description=“This is hello world feature.“
Scope=“Web“
Hidden=“FALSE“
ImageUrl=“menuprofile.gif“
xmlns=“http://schemas.microsoft.com/sharepoint/“>
<ElementManifests>
<ElementManifest Location=“elements.xml“ />
</ElementManifests>
</Feature>
We describe the attributes of the Feature tag as under:
Id: GUID which identifies the features uniquely. It can be created by clicking “Tools” menu of VS 2005 and then on “Create GUID”. “Create GUID” window will appear. Select “4 Registry Format (ie. (xxxx …))” option. Click on “Copy” button and paste the GUID against the Id attribute.
Title: Specifies the title of the feature.
Description: Specifies the description of the feature.
Scope: Scope defines the context in which feature is activated and deactivated. It can have four values namely Web, Site, WebApplication and Farm. Web specifies that the feature can be activated and deactivated within the context of site. Site specifies that the feature can be activated and deactivated within the context of the site collection. Same stands for WebApplication and Farm.
Hidden: Can be set to true or false. In case of true, feature is not visible in the list of available features. It can be activated or deactivated through command line, through custom code, or through an activation dependency with another feature.
ImageUrl: The image displayed next to the feature in the use interface. The last part is ElementManifests element. The element has inner element ElementManifest which specifies the reference of other XML file. This file defines other elements that make up the feature. In our case, we have one file “elements.xml”.
Create “elements.xml” file in the “HelloWorlFea” directory. The XML for the file is as under:
<Elements xmlns=“http://schemas.microsoft.com/sharepoint/“> <CustomAction Id=“SiteActionsToolbar“
GroupId=“SiteActions“
Location=“Microsoft.SharePoint.StandardMenu“
Sequence=“100“
Title=“Hello World“
Description=“A custom menu item added using a feature“
ImageUrl=“_layouts/images/menuprofile.gif“ >
<UrlAction Url=“http://www.google.com/>
</CustomAction>
</Elements >
Id has the name of the menu in which we want to add our menu item. Title and description specifies the text that will appear as title and description. UrlAction states the url of the site where user is redirected when clicked. In our case, it is http://www.google.com.
The next step is to deploy the feature unto the “FEATURE” directory. For this purpose we create a batch file and name it “deploy.bat”. The contents of the file are:
@SET TEMPLATEDIR=”C:\Program Files\Common Files\Microsoft Shared\web server extensions\12\TEMPLATE”
@SET STSADM=”C:\Program Files\Common Files\Microsoft Shared\web server extensions\12\BIN\stsadm”
Echo Copying filesxcopy /e /y TEMPLATE\* %TEMPLATEDIR%
Echo Installing feature%STSADM% -o InstallFeature -filename HELLOWorldFea\feature.xml -force
Echo Reatart IIS Worker Process
IISRESET
In the end, go to the properties of the project and then to “Build Events” tab. Write the following lines in the “post build event command line window:”
cd $(ProjectDir)
install.bat
The first line is required to change the current directory to that of the project directory. The second line runs the batch file to copy the feature files to the correct location and install the feature with the InstallFeature operation of the command-line STSADM.EXE utility. Now go to the “Site Features” page by moving from “Site Actions” to “Site Settings” and clicking on “Site Features” of your site. Here, “Hello World Feature” will be available. Activate it and you will be able to see a menu item added in the “Site Actions” menu. If you fail to find the feature, check the following steps:
- “HelloWorldFea” directory is added in the FEATURES directory at the path “C:\Program Files\Common Files\Microsoft Shared\web server extensions\12\TEMPLATE\FEATURES”
- Run the file “feature.xml” and “element.xml” to check that XML is error free.
If still unable to find the feature, try to deploy manually and see what happen.

